กลับอีกครั้งสำหรับบทความ Android คราวนี้ผมมากับ Custom Expandable ListView (ความรู้จะเพิ่มพูนเมื่อเราต้องทำงาน) หลังจากใช้แต่ ListView มานาน ไหนๆก็รู้แล้วเลยเอามาเขียนดู เผื่อมีใครจำเป็นต้องใช้จะได้ไม่ต้องเสียเวลา ส่วนใครอยากอ่านจากต้นฉบับภาษาอังกฤษเชิญได้ที่ Link
สิ่งที่ต้องการก่อนทำ ExpandableListView
Custom List View เบื้องต้น ของเว็บ Sleeping Forless
เอาล่ะ เข้าเรื่องกันเลย Expandable ListView เอาไว้แสดงข้อมูลที่เป็นชุดข้อมูล เช่น รายชื่อของผัก รายชื่อผลไม้ ซึ่งแยกเอาไว้เป็นหมวดหมู่ชัดเจน เมื่อเรากดที่หัวข้อ(Header) ข้อมูลในหมวด(Child)นั้นก็จะปรากฏออกมา
สร้างโปรเจคขึ้นมาโลด
1. เริ่มจากสร้าง activity_main.xml ขึ้นมา Layout นี้มีแค่ ExpandableListView เท่านั้น อย่าลืมใส่ Id ให้มันด้วย
xmlns:tools="http://schemas.android.com/tools" android:layout_width="match_parent"
android:layout_height="match_parent"
tools:context=".MainActivity">
<ExpandableListView
android:id="@+id/expand"
android:layout_width="match_parent"
android:layout_height="match_parent">
</ExpandableListView>
</RelativeLayout>
[/xml] 2. ต่อมาเราก็สร้างส่วนที่เป็น Header โดยสร้าง list_group.xml ให้มี background สีดำตัวหนังสือสีขาว(สีตามใจชอบเลยครับ)[xml] <?xml version="1.0" encoding="utf-8"?>
<LinearLayout xmlns:android="http://schemas.android.com/apk/res/android"
android:layout_width="match_parent"
android:layout_height="wrap_content"
android:orientation="vertical"
android:padding="8dp"
android:background="#000000">
<TextView
android:id="@+id/ExListHeader"
android:layout_width="match_parent"
android:layout_height="wrap_content"
android:text="Head"
android:textSize="17dp"
android:textColor="#ffffff" />
</LinearLayout>
[/xml]
3. จากนั้นมาสร้าง Child View ของข้อมูลภายในกัน โดยสร้าง list_child.xml ให้ตัวอักษรสีดำ พื้นขาว(จะได้ต่างกัน เห็นชัดๆ) เป็น View ที่เอาไว้แสดงเมื่อเรากดที่ Header แล้วจะแสดง View นี้ออกมา
[xml]
<?xml version="1.0" encoding="utf-8"?>
<LinearLayout xmlns:android="http://schemas.android.com/apk/res/android"
android:layout_width="match_parent"
android:layout_height="wrap_content"
android:orientation="vertical" >
<TextView
android:id="@+id/ExListChild"
android:layout_width="fill_parent"
android:layout_height="wrap_content"
android:text="Child"
android:textSize="17dip"
android:textColor="#0033ff"
android:paddingTop="5dp"
android:paddingBottom="5dp" />
</LinearLayout>
[/xml]
4. ในเมื่อเราทำ Custom Expandable ListView เราก็ต้องทำ CustomAdapter ของ ExpandableListView โดยผมใช้ชื่อว่า CustomExpandableListView.java ซึ่ง extend มาจาก BaseExpandableListAdapter
[java]
public class CustomExpandableListView extends BaseExpandableListAdapter {
private Context _context;
private List<String> _listDataHeader;
private HashMap<String, List<String>> _listDataChild;
public CustomExpandableListView(Context context, List<String> listDataHeader,
HashMap<String, List<String>> listChildData) {
this._context = context;
this._listDataHeader = listDataHeader;
this._listDataChild = listChildData;
}
@Override
public Object getChild(int groupPosition, int childPosititon) {
return this._listDataChild.get(this._listDataHeader.get(groupPosition))
.get(childPosititon);
}
@Override
public long getChildId(int groupPosition, int childPosition) {
return childPosition;
}
@Override
public View getChildView(int groupPosition, final int childPosition,
boolean isLastChild, View convertView, ViewGroup parent) {
final String childText = (String) getChild(groupPosition, childPosition);
if (convertView == null) {
LayoutInflater infalInflater = (LayoutInflater) this._context
.getSystemService(Context.LAYOUT_INFLATER_SERVICE);
convertView = infalInflater.inflate(R.layout.list_child, null);
}
TextView txtListChild = (TextView) convertView
.findViewById(R.id.ExListChild);
txtListChild.setText(childText);
return convertView;
}
@Override
public int getChildrenCount(int groupPosition) {
return this._listDataChild.get(this._listDataHeader.get(groupPosition))
.size();
}
@Override
public Object getGroup(int groupPosition) {
return this._listDataHeader.get(groupPosition);
}
@Override
public int getGroupCount() {
return this._listDataHeader.size();
}
@Override
public long getGroupId(int groupPosition) {
return groupPosition;
}
@Override
public View getGroupView(int groupPosition, boolean isExpanded,
View convertView, ViewGroup parent) {
String headerTitle = (String) getGroup(groupPosition);
if (convertView == null) {
LayoutInflater infalInflater = (LayoutInflater) this._context
.getSystemService(Context.LAYOUT_INFLATER_SERVICE);
convertView = infalInflater.inflate(R.layout.list_group, null);
}
TextView lblListHeader = (TextView) convertView
.findViewById(R.id.ExListHeader);
lblListHeader.setTypeface(null, Typeface.BOLD);
lblListHeader.setText(headerTitle);
return convertView;
}
@Override
public boolean hasStableIds() {
return false;
}
@Override
public boolean isChildSelectable(int groupPosition, int childPosition) {
return true;
}
}
[/java]
บรรทัดที่ 6 เป็นการ Initial ค่าของ Adapter นี้โดยรับข้อมูลของ Header กับ Child จาก MainActivity.java
บรรทัดที่ 25 getChildView จะเป็นส่วนที่กำหนด View ของ Group(Child) ที่เราจะให้แสดง โดยกำหนด txtListChild ด้วย Id แล้วใช้ setText จากข้อมูลของเรา
บรรทัดที่ 65 จะเป็นส่วนที่กำหนด View ของ Header วิธีก็คล้ายกับ Child คือ cast Textview จาก Id ของ xml ที่เรากำหนด ส่วนข้อมูลที่ใช้ setText ก็เอาจาก List ของ Header
บรรทัดที่ 88 ตรง return true หมายความว่าถ้ากดที่ header ข้อมูลด้านในจะกางออกมา ดูดีๆนะครับเดี๋ยวจะงงว่าทำไมทำแล้วพัง
5. กลับมาทำ MainActivity.java โดยผมทำข้อมูลตัวอย่างจากรายชื่อหนังแยกจากกัน ซึ่งกำหนดค่าใน Method prepareListData จากนั้นนำข้อมูลมาสร้าง CustomExpandableListView จากนั้นก็นำ Adapter ไปใส่ใน ExpandableListView ของเรา
[java]
public class MainActivity extends Activity {
CustomExpandableListView listAdapter;
ExpandableListView expListView;
List<String> listDataHeader;
HashMap<String, List<String>> listDataChild;
@Override
protected void onCreate(Bundle savedInstanceState) {
super.onCreate(savedInstanceState);
setContentView(R.layout.activity_main);
expListView = (ExpandableListView) findViewById(R.id.expand);
prepareListData();
listAdapter = new CustomExpandableListView(this, listDataHeader, listDataChild);
expListView.setAdapter(listAdapter);
}
private void prepareListData() {
listDataHeader = new ArrayList<String>();
listDataChild = new HashMap<String, List<String>>();
listDataHeader.add("IronMan");
listDataHeader.add("Thor");
listDataHeader.add("Captain America");
List<String> ironMan = new ArrayList<String>();
ironMan.add("Iron Man");
ironMan.add("Iron Man 2");
ironMan.add("Iron Man 3");
List<String> thor = new ArrayList<String>();
thor.add("Thor : God Of Thunder");
thor.add("Thor 2 : The Dark World");
List<String> captainAmerica = new ArrayList<String>();
captainAmerica.add("Captain America : The First Avenger");
captainAmerica.add("Captain America 2 : The Winter Soilder");
listDataChild.put(listDataHeader.get(0), ironMan); // Header, Child data
listDataChild.put(listDataHeader.get(1), thor);
listDataChild.put(listDataHeader.get(2), captainAmerica);
}
}
[/java]
แล้วก็บรึ๊มเป็นโกโก้ครั้น ไม่ช่ายยยยยยย

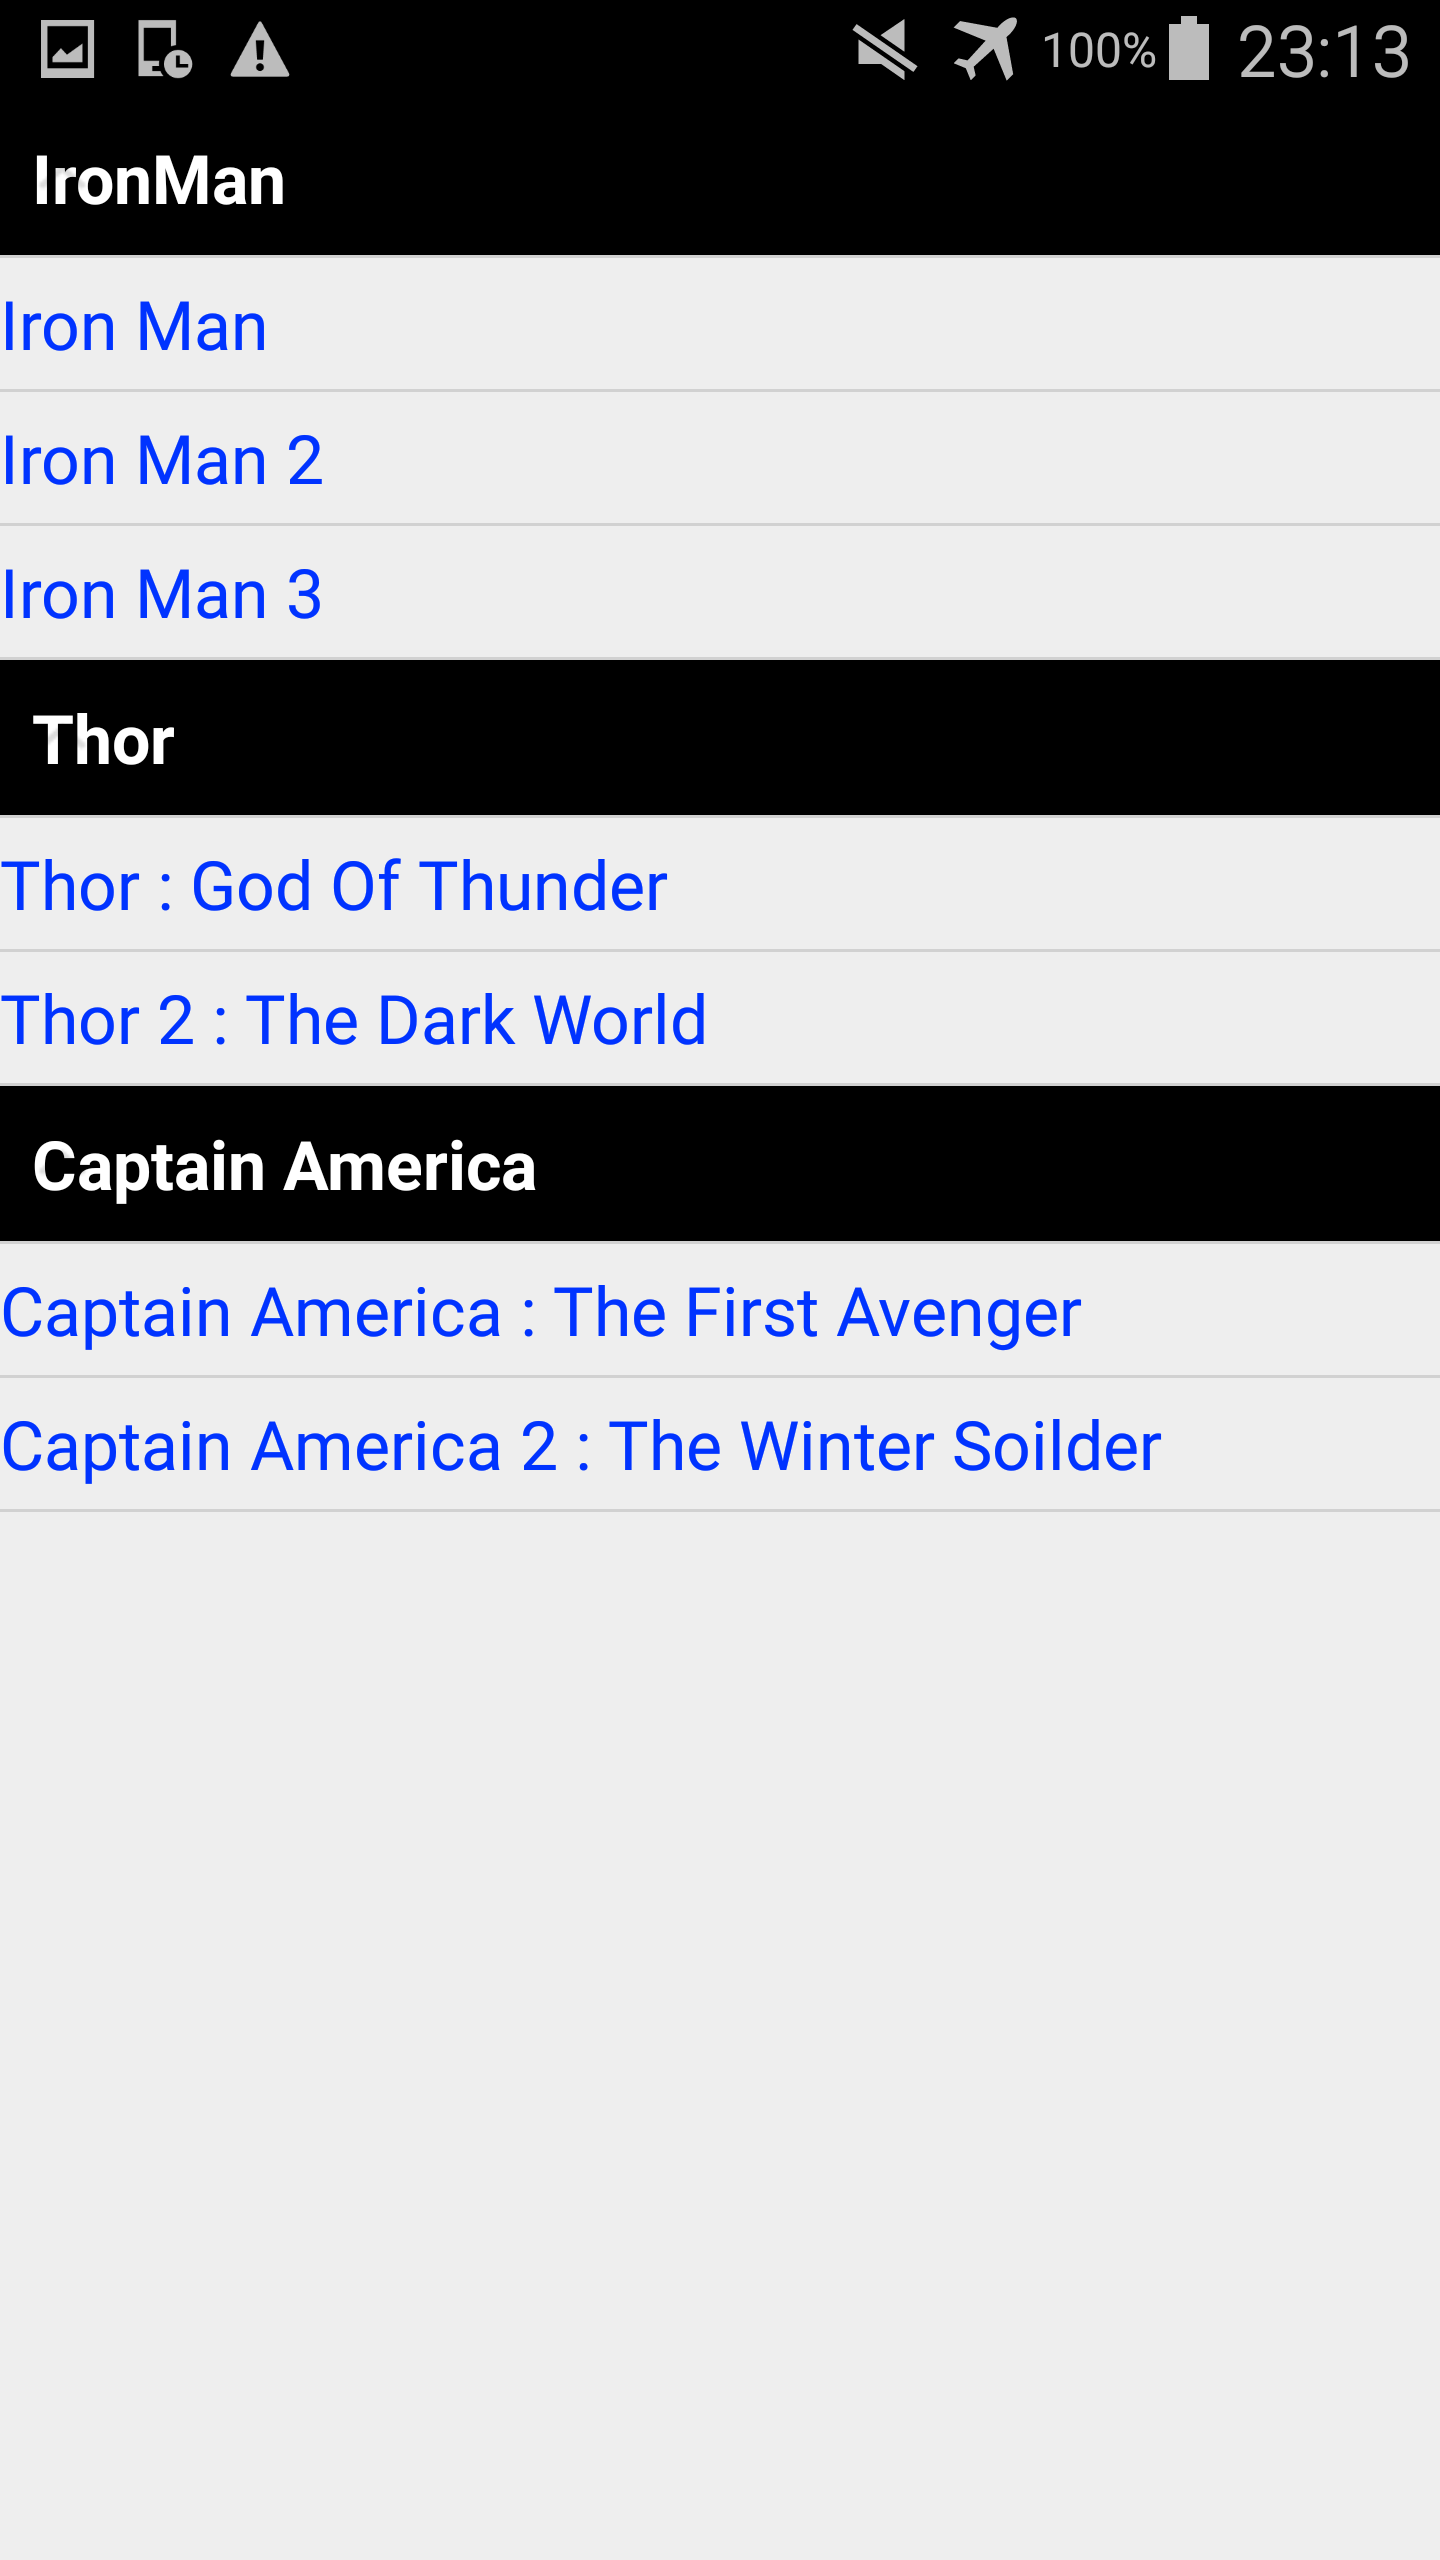
ExpandableListView แบบที่ยังไม่ได้กด
ExpandableListView แบบกดที่ Header เพื่อเปิด Child แล้ว
[java] expListView.setOnGroupClickListener(new ExpandableListView.OnGroupClickListener() {
@Override
public boolean onGroupClick(ExpandableListView parent, View v, int groupPosition, long id) {
Toast.makeText(getApplicationContext(), listDataHeader.get(groupPosition), Toast.LENGTH_SHORT).show();
return false;
}
});
[/java] เมื่อกดเราจะมี Toast แสดงว่าเรากดที่ Header
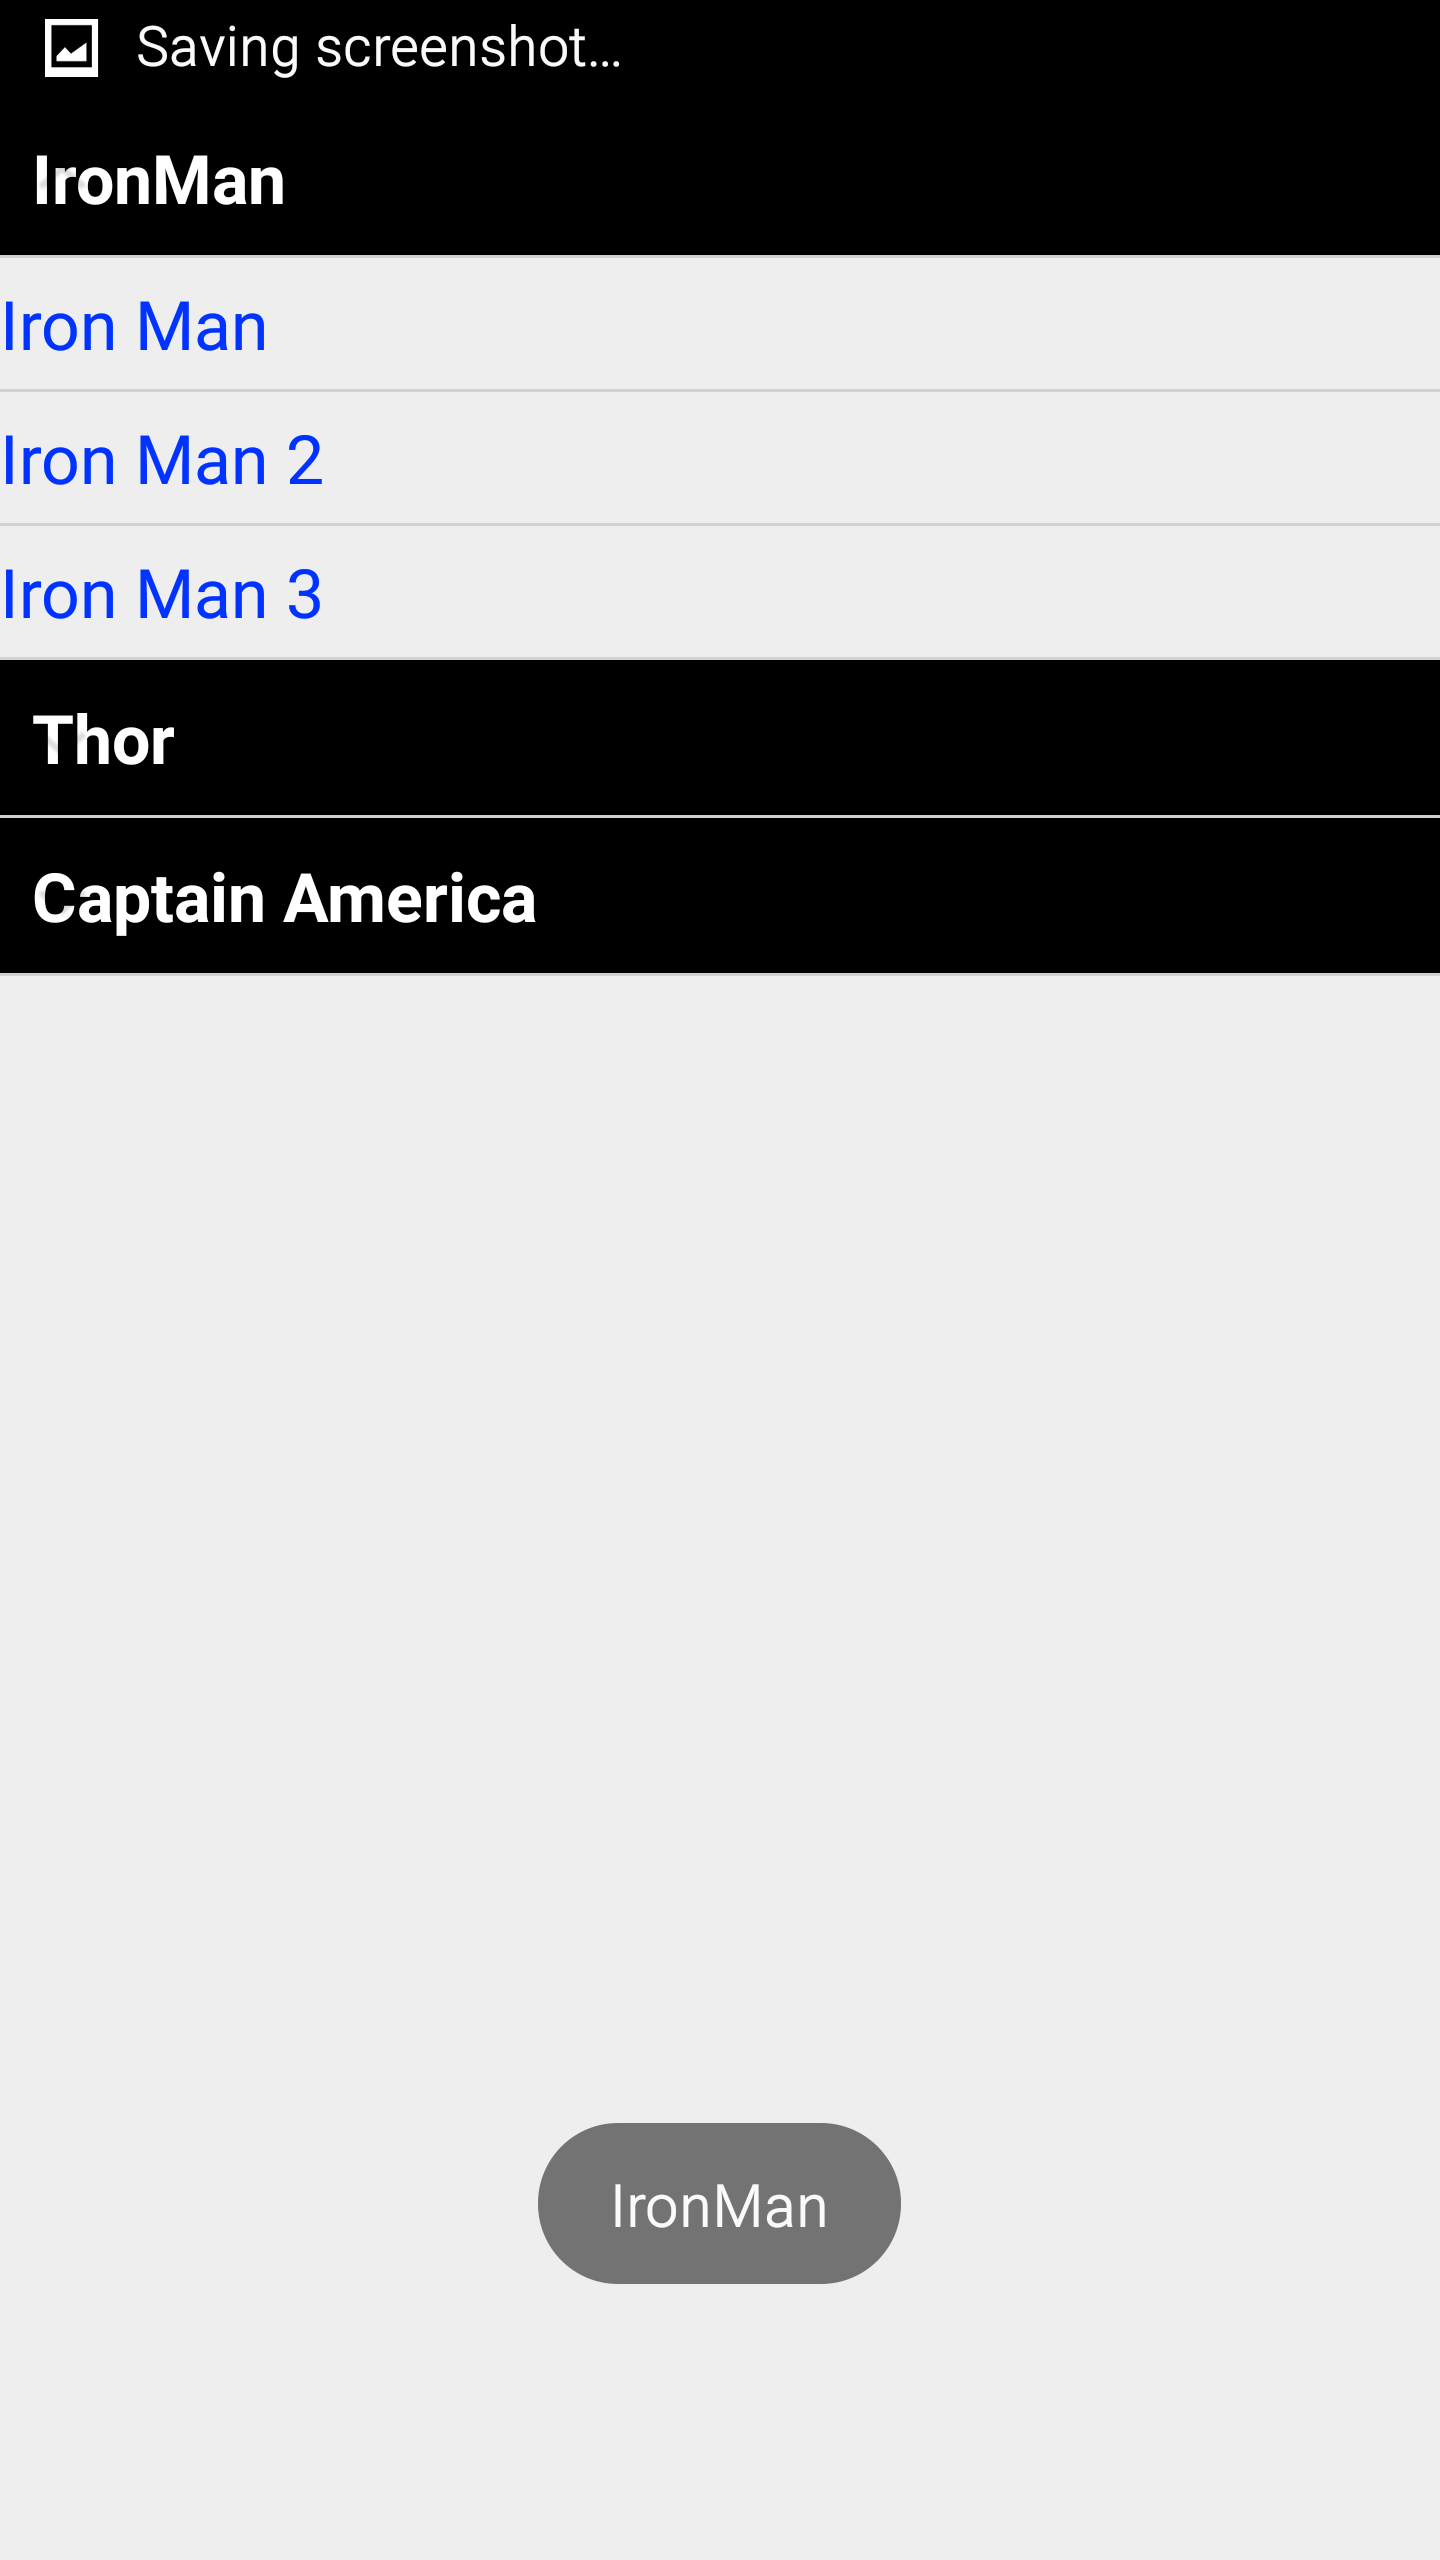
แสดง Toast เมื่อกดที่ Header
[java] expListView.setOnChildClickListener(new ExpandableListView.OnChildClickListener() {
@Override
public boolean onChildClick(ExpandableListView parent, View v, int groupPosition, int childPosition, long id) {
Toast.makeText(getApplicationContext(),
listDataHeader.get(groupPosition) + " : "
+ listDataChild.get(listDataHeader.get(groupPosition)).get(childPosition),
Toast.LENGTH_SHORT).show();
return false;
}
});
[/java] เมื่อกดเราจะมี Toast แสดงว่าเรากดที่ Child
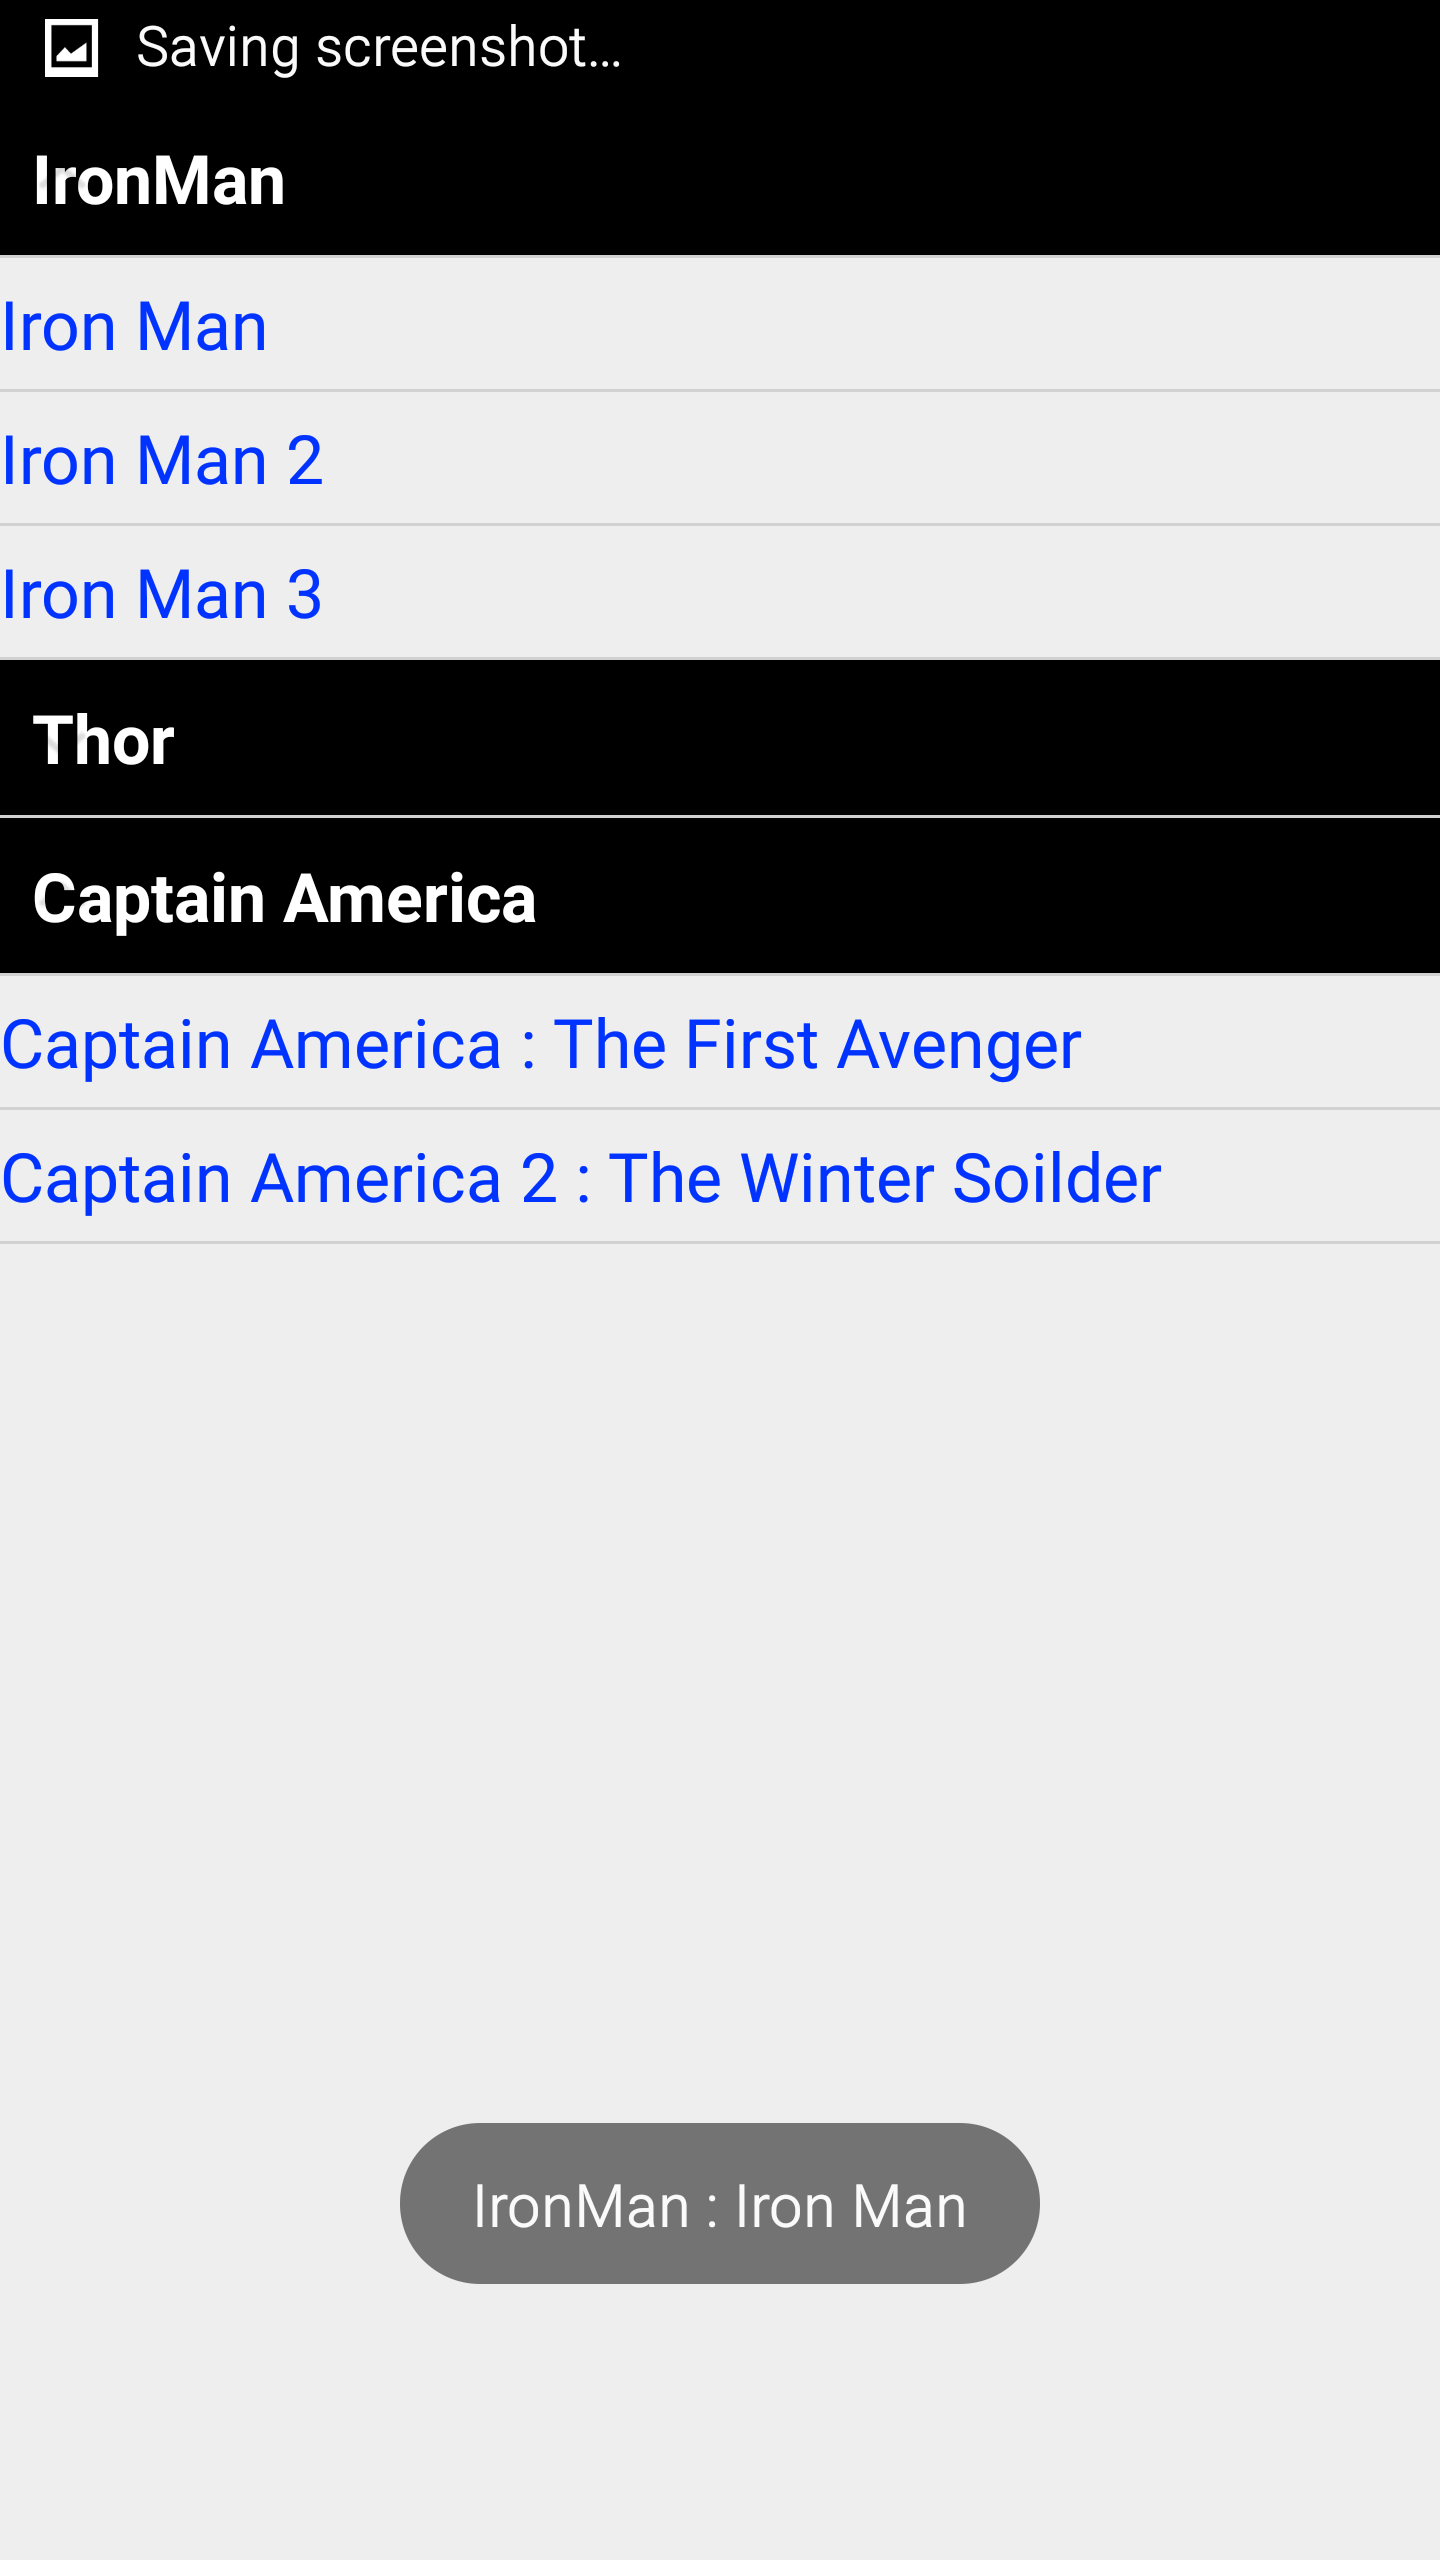
แสดง Toast เมื่อกด Child
MainActivity.java แบบเต็ม
[java]
public class MainActivity extends Activity {
CustomExpandableListView listAdapter;
ExpandableListView expListView;
List<String> listDataHeader;
HashMap<String, List<String>> listDataChild;
@Override
protected void onCreate(Bundle savedInstanceState) {
super.onCreate(savedInstanceState);
setContentView(R.layout.activity_main);
expListView = (ExpandableListView) findViewById(R.id.expand);
prepareListData();
listAdapter = new CustomExpandableListView(this, listDataHeader, listDataChild);
expListView.setAdapter(listAdapter);
expListView.setOnGroupClickListener(new ExpandableListView.OnGroupClickListener() {
@Override
public boolean onGroupClick(ExpandableListView parent, View v, int groupPosition, long id) {
Toast.makeText(getApplicationContext(), listDataHeader.get(groupPosition), Toast.LENGTH_SHORT).show();
return false;
}
});
expListView.setOnChildClickListener(new ExpandableListView.OnChildClickListener() {
@Override
public boolean onChildClick(ExpandableListView parent, View v, int groupPosition, int childPosition, long id) {
Toast.makeText(getApplicationContext(),
listDataHeader.get(groupPosition) + " : "
+ listDataChild.get(listDataHeader.get(groupPosition)).get(childPosition),
Toast.LENGTH_SHORT).show();
return false;
}
});
}
private void prepareListData() {
listDataHeader = new ArrayList<String>();
listDataChild = new HashMap<String, List<String>>();
listDataHeader.add("IronMan");
listDataHeader.add("Thor");
listDataHeader.add("Captain America");
List<String> ironMan = new ArrayList<String>();
ironMan.add("Iron Man");
ironMan.add("Iron Man 2");
ironMan.add("Iron Man 3");
List<String> thor = new ArrayList<String>();
thor.add("Thor : God Of Thunder");
thor.add("Thor 2 : The Dark World");
List<String> captainAmerica = new ArrayList<String>();
captainAmerica.add("Captain America : The First Avenger");
captainAmerica.add("Captain America 2 : The Winter Soilder");
listDataChild.put(listDataHeader.get(0), ironMan); // Header, Child data
listDataChild.put(listDataHeader.get(1), thor);
listDataChild.put(listDataHeader.get(2), captainAmerica);
}
}
[/java]
